


Selleys White For Life Tile Adhesive
White for Life Tile Adhesive is an easy to use, flexible, high grab wall and floor tile adhesive suitable for small tiling jobs and repairs.
If you want to create a stylish splashback in your kitchen – tiles are an affordable DIY option that can add, colour, pattern or texture to a space.
Learn how to tile your kitchen splashback in 3 steps with the Selleys White For Life triple pack complete with tile adhesive, tile grout and tile sealant!
Ensure surfaces are clean and free from grease or loose particles. Any fresh paint, membranes/coatings, render or concrete, must be allowed sufficient time to cure before tiling is done.
White for Life Tile Adhesive is an easy to use, flexible, high grab wall and floor tile adhesive suitable for small tiling jobs and repairs.
Selleys White For Life Ready To Use Grout is a water-based easy to use, brilliant white grout, ideal for wall and floor tiles and for joints up to 5mm wide. It resists yellowing, staining or blackening, when used as a part of the Selleys White For Life™ Tiling System and as per pack directions*.
Selleys White For Life advanced silicone technology does not blacken, yellow or stain, maintaining its brilliant white sheen. Cured sealent is guaranteed to resist mould and mildew growth for 5 years#
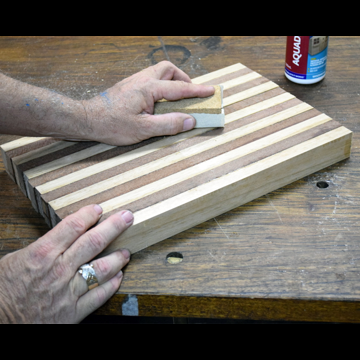
Keep on trend and learn how to create a stunning chopping board for serving which will be the envy of your friends at your next dinner party.
Sealing your splashback is the final step to installing a splashback and perhaps the most important! It's super easy to do with Selleys silicone sealant.
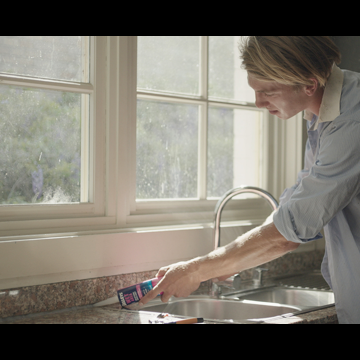
Getting a proper seal around your sink prevents water penetration. Here’s the best way to ensure a complete seal around your sink area to make it easier to clean and less prone to water damage and discolouration. And all without the need for a caulking
It’s time to face it – brave opening the oven door and take a good look inside, because getting rid of grime is too easy with Selleys Oven Cleaning product range.


Share
Share this article with your friends